E kūlia i ka nu’u. Strive to reach the highest.
1. Introduction to Hawaii
The Hawaii Framework is a Java framework for developing Spring based applications.
It provides production-ready features and integrations based best practices and experience to boost projects.
The Hawaii Framework is developed internally at QNH and is used in projects for medium and large enterprise customers.
1.1. Spring Boot
Combining Spring Boot and the Hawaii production-ready features and auto configuration brings even more power and simplicity to developers, without sacrificing flexibility.
The Hawaii Framework also provides various Spring Boot Starters to automatically include the needed dependencies and trigger the auto configuration of the Hawaii production-ready features.
But it is important to mention that most of the Hawaii features can also used without using Spring Boot. In that case the desired features need to be configured manually by defining the appropriate Spring beans inside the application’s context.
3. Hawaii Features
TODO.
3.1. Environments
TODO.
3.3. Logging
The Hawaii logging feature provides a number of filter beans which add information that can log information about requests. The Hawaii logging is only usable in a servlet environment, because all filters use HttpServletRequest and HttpServletResponse to obtain information.
The main purpose of Hawaii logging is to write structured information into log lines, in such a way that it can be parsed by elastic search (Kibana). A specialized encoder is included to write out the log lines, as well as a bunch of filters that gather and, in some cases, create information to be included in each message. Hawaii logging currently only contains a logback-based encoder, so Hawaii logging is only usable if you use logback as your logging implementation.
The next sections describe the individual filters contained in the Hawaii logging module. For more information on disabling and configuring individual filters, please refer to the Hawaii logging starter.
3.3.1. Kibana
The Kibana log filter gathers request data such as request method, uri and client ip address and stores it so it can be added to subsequent log messages.
3.3.2. Kibana cleanup
The Kibana cleanup filter empties all Kibana-specific data after the rest of the filter chain has been processed. It is intended to be used early in the chain, such that the cleanup happens last.
3.3.3. Request duration
This filter determines the duration of the request in milliseconds. It add the duration to the Kibana fields and logs it.
3.3.4. Request id
This filter generates a new request id, adds it to the Kibana fields and also writes it as a header on the response.
3.3.5. Transaction id
This filter reads an incoming transaction id from a request header, or generates a new one. The transaction id is written to a response header and added to the Kibana fields. The ability to read an incoming transaction id provides the ability to have multiple requests, spanning multiple systems within the same transaction.
3.3.6. User details
This filter retrieves the authenticated principal from the security context and stores the user name in the Kibana fields so that it gets included in each log message. This filter is only instantiated if Spring security is found on the class path.
3.3.7. Request/response
This filter logs the content type, size, headers and body of incoming requests, as well as the response status, headers and body. Optionally, the filter can log the response to a file if it exceeds a certain threshold size.
3.4. Hawaii Time
HawaiiTime is not merely a convenient wrapper to instantiate new java.time date and time objects.
It provides an application wide java.time.Clock reference which is particular useful for unit testing.
It is similar to Joda’s DateTimeUtils which also allows setting a fixed current time.
However it is important to note that Joda’s DateTimeUtils uses a static variable to store the current time.
HawaiiTime does not take this approach. Instead the HawaiiTime bean needs to be injected in any class that needs to instantiate new date
and time objects. This approach is more flexible and e.g. has the benefit that unit tests can be run in parallel. See example usage below.
public class MyClass {

	private HawaiiTime hawaiiTime;

	public MyClass(HawaiiTime hawaiiTime) { (1)
		this.hawaiiTime = hawaiiTime;
	}

	public void doSomethingWithDate() {
		ZonedDateTime dateTime = this.hawaiiTime.zonedDateTime(); (2)
		// ...
	}
}


public class MyClassTests {

	@Test
	public void testDoSomethingWithDate() {
	    long millis = System.currentTimeMillis();
		HawaiiTime hawaiiTime = new HawaiiTime();
		hawaiiTime.useFixedClock(millis); (3)
		MyClass myClass = new MyClass(hawaiiTime);
		myClass.doSomethingWithDate();
		// ...
	}
}| 1 | Inject the HawaiiTime bean. |
| 2 | Use the injected HawaiiTime bean to instantiate new date and time objects. |
| 3 | In unit tests a fixed clock can be used to manipulate and predict the exact current time. |
Another benefit of using HawaiiTime is that a fixed time can be used in a running application to test how it behaves on a given date or
time.
Third-party libraries being used by the application do not use HawaiiTime and probably instantiate date and time objects based on
the System time.
|
Hawaii uses UTC as default timezone but this can be changed by setting the hawaii.time.timezone configuration property. The provided
value will be parsed by java.time.ZoneId#of(String zoneId) and supports different timezone formats like UTC, Europe/Amsterdam and
GMT+1.
The creation of the HawaiiTime bean can also be disabled by setting hawaii.time.enabled to false.
3.5. Validation
Hawaii’s validation mechanism can be used to validate any object. It basically validates values, collects validation errors and stores them in a validation result. These validation errors are simple field / error code combinations.
Hawaii’s Validator is inspired on Spring’s org.springframework.validation.Validator mechanism. However Hawaii’s validator mechanism
uses it’s own ValidationResult instead of Spring’s org.springframework.validation.Errors. The main difference is that Hawaii’s
ValidationResult does not bind directly the object being validated. This also gives the possibility to add errors for specific keys that
are not direct properties of the object being validated.
Hawaii’s validation mechanism also provides additional sugar like Hamcrest matcher support to write human readable validating code,
the capability to validate and automatically throw a ValidationException in case of errors etc.
Like Spring’s validation mechanism the Hawaii validation mechanism also supports the notion of nested error paths which also stimulates to re-use validators.
Let’s take an example. Imagine a Customer object with common name, e-mail, and address fields. A validation result could for example
contain the following field / error code combinations:
first_name = required (1)
last_name = max_length_exceeded
email = invalid
addresses = primary_address_required (2)
addresses[0].type = invalid (3)
addresses[0].street_name = max_length_exceeded
addresses[0].postal_code = invalid
addresses[0].city = max_length_exceeded
addresses[0].country_code = required| 1 | The field first_name has an required error code. |
| 2 | The field adresses (an array in this case) has primary_address_required error code. |
| 3 | The field type of the first address in the addresses array has a invalid error code. |
The example demonstrates simple field errors (like first_name) but also storing errors for arrays and nested paths (addresses[0].type).
In theory a field could also have multiple error codes if needed.
Implementors should typically only implement the org.hawaiiframework.sample.validator.Validator#validate(Object, ValidationResult) method
as the other methods in the interface are already implemented using the interface’s default methods.
A generic EmailValidator would look like:
import org.hawaiiframework.validation.ValidationResult;
import org.hawaiiframework.validation.Validator;
import org.springframework.stereotype.Component;

import java.util.regex.Pattern;

@Component
public class EmailValidator implements Validator<String> { (1)

    public static final String EMAIL_PATTERN = "^[_A-Za-z0-9-\\+]+(\\.[_A-Za-z0-9-]+)*@[A-Za-z0-9-]+(\\.[A-Za-z0-9]+)*(\\.[A-Za-z]{2,})$";

    private Pattern pattern;

    public EmailValidator() {
        this.pattern = Pattern.compile(EMAIL_PATTERN);
    }

    @Override
    public void validate(String email, ValidationResult validationResult) { (2)
        if (!pattern.matcher(email).matches()) {
            validationResult.rejectValue("invalid"); (3)
        }
    }
}| 1 | Implement the Validator (in this case a String). |
| 2 | Override the Validator#validate(Object, ValidationResult) method. |
| 3 | In case the e-mail is invalid, reject the value with error code invalid and store it in the validation result. |
The CustomerValidator would look like:
import org.apache.commons.lang3.StringUtils;
import org.hawaiiframework.sample.validator.EmailValidator;
import org.hawaiiframework.validation.ValidationResult;
import org.hawaiiframework.validation.Validator;
import org.springframework.stereotype.Component;

import java.util.List;

import static org.hamcrest.Matchers.greaterThan;

@Component
public class CustomerInputValidator implements Validator<CustomerInput> { (1)

    private final EmailValidator emailValidator;
    private final AddressValidator addressValidator;

    public CustomerInputValidator(final EmailValidator emailValidator,
            final AddressValidator addressValidator) { (2)
        this.emailValidator = emailValidator;
        this.addressValidator = addressValidator;
    }

    @Override
    public void validate(CustomerInput customer, ValidationResult validationResult) { (3)

        // first name validation
        String firstName = customer.getFirstName();
        if (StringUtils.isBlank(firstName)) {
            validationResult.rejectValue("first_name", "required");
        } else {
            validationResult.rejectValueIf(firstName.length(), greaterThan(25), "first_name",
                    "max_length_exceeded");
        }

        // last name validation
        String lastName = customer.getLastName();
        if (StringUtils.isBlank(lastName)) {
            validationResult.rejectValue("last_name", "required");
        } else {
            validationResult.rejectValueIf(lastName.length(), greaterThan(25), "last_name",
                    "max_length_exceeded");
        }

        // e-mail validation
        String email = customer.getEmail();
        if (StringUtils.isBlank(email)) {
            validationResult.rejectValue("email", "required");
        } else if (email.length() > 100) {
            validationResult.rejectValue("email", "max_length_exceeded");
        } else {
            validationResult.pushNestedPath("email");
            emailValidator.validate(email, validationResult);
            validationResult.popNestedPath();
        }

        // adresses validation
        List<Address> addresses = customer.getAddresses();
        if (addresses == null || addresses.size() == 0) {
            validationResult.rejectValue("addresses", "required");
        } else {
            // addresses array validations
            long primaries = addresses.stream()
                    .filter(address -> address.getType() == AddressType.PRIMARY)
                    .count();
            if (primaries == 0) {
                validationResult.rejectValue("addresses", "primary_address_required");
            } else if (primaries > 1) {
                validationResult.rejectValue("addresses", "only_1_primary_address_allowed");
            }
            if (addresses.size() > 3) {
                validationResult.rejectValue("addresses", "max_array_length_exceeded");
            }
            // address validations
            for (int i = 0; i < addresses.size(); i++) {
                validationResult.pushNestedPath("addresses", i);
                addressValidator.validate(addresses.get(i), validationResult);
                validationResult.popNestedPath();
            }
        }
    }
}| 1 | Implement the Validator (in this case a Customer). |
| 2 | Inject other validators (EmailValidator, AddressValidator) to be re-used. |
| 3 | Override the Validator#validate(Object, ValidationResult) method. |
4. Hawaii Starters
TODO.
4.1. hawaii-starter
TODO.
4.2. hawaii-starter-logging
The hawaii-starter-logging delivers a fully configured set of filters that are added to the filter chain in the configured order. The
starter contains a default configuration, which can be overridden by adding properties to your configuration. The default configuration
consists of the filters listed in the table below.
Filters with a negative order are added to the filter chain before any filters that modify or wrap the request and/or response. The UserDetailsFilter depends on Spring Security (it logs the authenticated Principal) and therefor has a higher order.
| Filter | Enabled | Order | Additional properties |
|---|---|---|---|
kibana-log |
true |
-108 |
|
kibana-log-cleanup |
true |
-110 |
- |
request-duration |
true |
-109 |
- |
request-id |
true |
-106 |
|
request-response |
true |
-105 |
|
transaction-id: |
true |
-107 |
|
user-details |
true |
110 |
- |
An example of the default configuration is available in the appendix.
4.2.1. How to use
In order to use Hawaii logging, you’ll need to define an appender that uses the KibanaLogEventEncoder, for example:
    <appender name="kibana" class="ch.qos.logback.core.rolling.RollingFileAppender">
        <file>log/idm-kibana.log</file>
        <encoder class="org.hawaiiframework.logging.logback.KibanaLogEventEncoder"/>
        <rollingPolicy class="ch.qos.logback.core.rolling.TimeBasedRollingPolicy">
            <fileNamePattern>${tomcat_logs}/hawaii-idm.log.%d{yyyy-MM-dd}.gz</fileNamePattern>
            <maxHistory>10</maxHistory>
        </rollingPolicy>
    </appender>
4.3. hawaii-starter-rest
TODO.
4.4. hawaii-starter-test
TODO.
4.5. hawaii-starter-async
The asynchronous request execution in Hawaii is built on top of the scheduling in Spring Framework, see the Spring documentation for a baseline explanation.
There are two main additions:
-
More flexibility in executor configuration
-
Task timeout
4.5.1. Executor configuration
The Hawaii async configuration allows the definition of executors. An executor can be viewed as a thread pool. An executor configuration looks something like this:
executors:
-
    name: default
    corePoolSize: 10
    keepAliveTime: 60
    maxPendingRequests: 60
    maxPoolSize: 60
The lowest level of configuration is a task. Tasks are grouped into systems. A system could be some backend system against which requests are executed, or a database on which queries are executed. Each request or query represents a task in Hawaii async terminology. System and task configuration looks like this:
systems:
  -
      name: mySystem
      defaultExecutor: myExecutor
      defaultTimeout: 3
      tasks:
        -
            method: myTask
            executor: mySpecialExecutor
            timeout: 1
        -
            method: myOtherTask
As can be seen, an executor can be assigned on system level. This will be the default executor for all the tasks in the system,
unless a specific executor is configured for a task, such as myTask in the example. The same mechanism applies to the timeout settings.
It is therefore perfectly legal to configure a task without any properties. However, it remains necessary to define the task
in the configuration, otherwise it can’t be used, i.e. every task must be defined in the configuration.
Finally, there are some global properties:
defaultExecutor: default
defaultTimeout: 10
asyncTimeoutExecutorPoolSize: 10
These define the default executor and timeout. These defaults will be used if no executor or timeout is defined on either task or system.
The asyncTimeoutExecutorPoolSize property defines the number of threads that are used to run timeout tasks.
See task timeout.
4.5.2. Task timeout
Another addition is automatically timing out tasks. For each task that is executed, the Hawaii async framework enqueues a cancellation task into a separate executor. If the timeout moment arrives, the timeout task is executed and will attempt to abort the actual task being executed. The actual task will remove the timeout task when it finishes, so if a task runs within its time limit, the timeout task will never be run.
4.5.3. Usage
In practice, using the Hawaii asynchronous framework is not that different from using Spring’s: asynchronous execution must be
enabled with @EnableAsync and methods that are to be executed asynchronously must be annotated with the @Async annotation,
and they must have a Future typed return value.
Additionally, an asynchronous configuration must be defined in the file identified by the hawaii.async.configuration property,
which is set to ./config/async-config.yml by default.
The essential difference in usage is that where Spring allows the specification of an executor by specifying the value of the
@Async annotation, the Hawaii additions require specifying the Task name instead of the executor. The Hawaii async configuration will
take care of routing the execution to the correct Executor.
HTTP
To execute http requests using the Hawaii async framework, you’ll need to use the HawaiiHttpComponentsClientHttpRequestFactory to enable
timing out of tasks that run too long.
You can use the LoggingClientHttpRequestInterceptor to log requests and responses made over http. Note that since this interceptor
consumes the response, this will only work if you wrap the HawaiiHttpComponentsClientHttpRequestFactory in a
org.springframework.http.client.BufferingClientHttpRequestFactory, or take other measures to make sure the response can be read
more than once.
4.5.4. Components
The following diagram shows the various components in the Hawaii async solution:
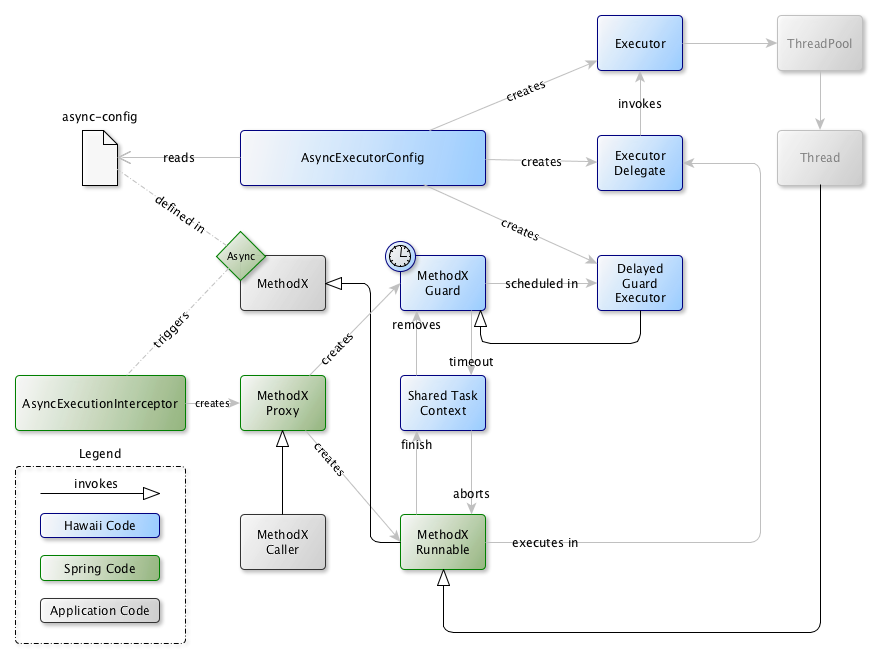
In the diagram, MethodX is the call that must be executed asynchronously, for example service or repository method. The @Async
annotation causes Spring to create a proxy around this method. The proxy locates the executor, which in the Hawaii case is a
DelegatingExecutor which will delegate to the real executor specified for the task. The executor takes the MethodX Runnable
and executes it on an available thread.
Additionally, a delayed (by the configured timeout) task, the MethodX Guard is created and passed to the Delayed Guard Executor.
Both tasks share the Shared Task Context which allows them to share logging context, and which also provides access for the
guarded task to remove the guard task upon completion, and for the guard task to abort the guarded task upon activation.
4.5.5. Processing
The sequence below shows the components working together to execute a task.

The sequence below shows the flow when a task times out.

5. Deployment
TODO.
Appendices
Appendix A: Hawaii application properties
Various properties can be specified inside your application.properties/application.yml file or as command line switches.
This section provides a list of available Hawaii application properties.
# ===================================================================
# HAWAII PROPERTIES
#
# This sample file is provided as a guideline. Do NOT copy it in its
# entirety to your own application.               ^^^
# ===================================================================

# HAWAII SPRING BOOT DEFAULTS
spring:
  jackson:
	date-format: com.fasterxml.jackson.databind.util.ISO8601DateFormat
	property-naming-strategy: CAMEL_CASE_TO_LOWER_CASE_WITH_UNDERSCORES
	serialization:
	  indent-output: false
	  write-dates-as-timestamps: false
	  write-date-timestamps-as-nanoseconds: false
logging:
  file: log/hawaii.log
  level:
	  org.hawaiiframework: INFO
	  org.springframework: INFO


# HAWAII TIME
hawaii:
  time:
    enabled: true # Enable creation of the `HawaiiTime` bean.
    timezone: UTC # The timezone to use like `UTC`, `Europe/Amsterdam` or `GMT+1`.
     async:
       configuration: ./config/async-config.yml # location of the Hawaii async configuration file
     logging:
       filters:
         kibana-log:
           enabled: true
           order: -108
           http-header: X-Hawaii-Frontend-IP-Address
         kibana-log-cleanup:
           enabled: true
           order: -110
         request-duration:
           enabled: true
           order: -109
         request-id:
           enabled: true
           order: -106
           http-header: X-Hawaii-Request-Id
         request-response:
           enabled: true
           order: -105
           fallbackToFile: true
           directory: /tmp
           maxLogSize: 50k
           # For console logging, the allowed content types, empty means allow all.
           allowedContentTypes:
             - application/json
             - text/plain
             - text/xml
         transaction-id:
           enabled: true
           order: -107
           http-header: X-Hawaii-Tx-Id
         user-details:
           enabled: true
           order: 110

---

spring:
  profiles: dev
  jackson:
	serialization.indent-output: true
logging:
  level:
	org.hawaiiframework: DEBUG

---

spring:
  profiles: test

---

spring:
  profiles: prod